
Spring Cloud Alibaba 创建服务消费者(Feign)
上篇文章, Spring Cloud Alibaba 创建服务消费者(RestTemplate + LoadBalancerClient),
我们一起学习了 使用 RestTemplate + LoadBalancerClient 的方式 去创建服务消费者,但是依旧显得繁琐,本文,我们将结合使用 spring-cloud-openfeign 来创建服务消费者,简化消费调用…
一起开始吧
————————————————
概述
Feign 是一个声明式的伪 Http 客户端,它使得写 Http 客户端变得更简单。使用 Feign,只需要创建一个接口并注解。它具有可插拔的注解特性,可使用 Feign 注解和 JAX-RS 注解。Feign 支持可插拔的编码器和解码器。Feign 默认集成了 Ribbon,Nacos 也很好的兼容了 Feign,默认实现了负载均衡的效果
- Feign 采用的是基于接口的注解
- Feign 整合了 ribbon
POM
创建一个工程名为 hello-spring-cloud-alibaba-nacos-consumer-feign 的服务消费者项目,pom.xml 配置如下:
<?xml version="1.0" encoding="UTF-8"?>
<project xmlns="http://maven.apache.org/POM/4.0.0"
         xmlns:xsi="http://www.w3.org/2001/XMLSchema-instance"
         xsi:schemaLocation="http://maven.apache.org/POM/4.0.0 http://maven.apache.org/xsd/maven-4.0.0.xsd">
    <parent>
        <artifactId>sous</artifactId>
        <groupId>com.yinzhong</groupId>
        <version>1.0-SNAPSHOT</version>
    </parent>
    <modelVersion>4.0.0</modelVersion>

    <artifactId>openfeign</artifactId>
    <dependencies>
        <!-- Spring Boot Begin -->
        <dependency>
            <groupId>org.springframework.boot</groupId>
            <artifactId>spring-boot-starter-web</artifactId>
        </dependency>
        <dependency>
            <groupId>org.springframework.boot</groupId>
            <artifactId>spring-boot-starter-actuator</artifactId>
            <version>2.4.5</version>
        </dependency>
        <dependency>
            <groupId>org.springframework.boot</groupId>
            <artifactId>spring-boot-starter-test</artifactId>
            <scope>test</scope>
            <version>2.4.5</version>
        </dependency>
        <!-- Spring Boot End -->

        <!-- Spring Cloud Begin -->

        <dependency>
            <groupId>org.springframework.cloud</groupId>
            <artifactId>spring-cloud-starter-openfeign</artifactId>
            <version>3.0.3</version>
        </dependency>
        <dependency>
            <groupId>org.springframework.cloud</groupId>
            <artifactId>spring-cloud-loadbalancer</artifactId>
            <version>3.0.2</version>
        </dependency>
        <dependency>
            <groupId>com.alibaba.cloud</groupId>
            <artifactId>spring-cloud-starter-alibaba-sentinel</artifactId>
            <version>2.2.3.RELEASE</version>
        </dependency>

        <!-- Spring Cloud End -->
    </dependencies>

    <build>
        <plugins>
            <plugin>
                <groupId>org.springframework.boot</groupId>
                <artifactId>spring-boot-maven-plugin</artifactId>
                <configuration>
                    <mainClass>com.yinzhong.openfeign.OpenFeignApplication</mainClass>
                </configuration>
            </plugin>
        </plugins>
    </build>


</project>
主要增加了 org.springframework.cloud:spring-cloud-starter-openfeign 依赖
Application
通过 @EnableFeignClients 注解开启 Feign 功能
package com.yinzhong.openfeign;

import org.springframework.boot.SpringApplication;
import org.springframework.boot.autoconfigure.SpringBootApplication;
import org.springframework.cloud.client.discovery.EnableDiscoveryClient;
import org.springframework.cloud.openfeign.EnableFeignClients;

@SpringBootApplication
@EnableDiscoveryClient
@EnableFeignClients
public class OpenFeignApplication {
    public static void main(String[] args) {
        SpringApplication.run(OpenFeignApplication.class, args);
    }
}
创建 Feign 接口
通过 @FeignClient("服务名") 注解来指定调用哪个服务。代码如下:
@FeignClient(value = “customs”)
public interface FeignService {
    @GetMapping(value = "/pay/aaa")
    String test();
}
Controller
@RestController
public class NacosConsumerFeignController {

    @Autowired
    private FeignService FeignService;

    @GetMapping(value = "/test/hi")
    public String test(HttpServletRequest request) {
        return FeignService.test();
    }
}
application.yml
spring:
  application:
    name: openfeign
  cloud:
    nacos:
      discovery:
        server-addr: 127.0.0.1:8848

server:
  port: 9092

management:
  endpoints:
    web:
      exposure:
        include: "*"
测试负载均衡
- idea启动多个实例
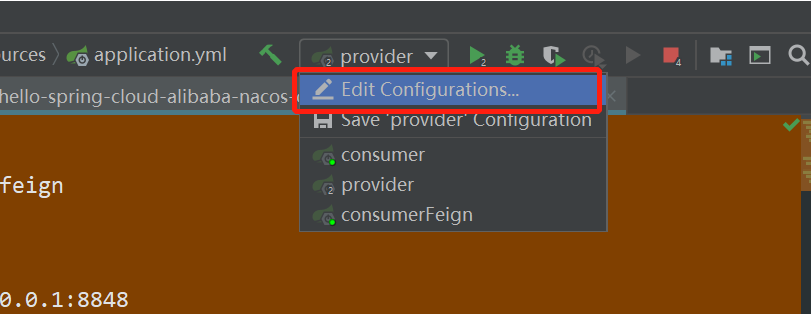
在这里选√
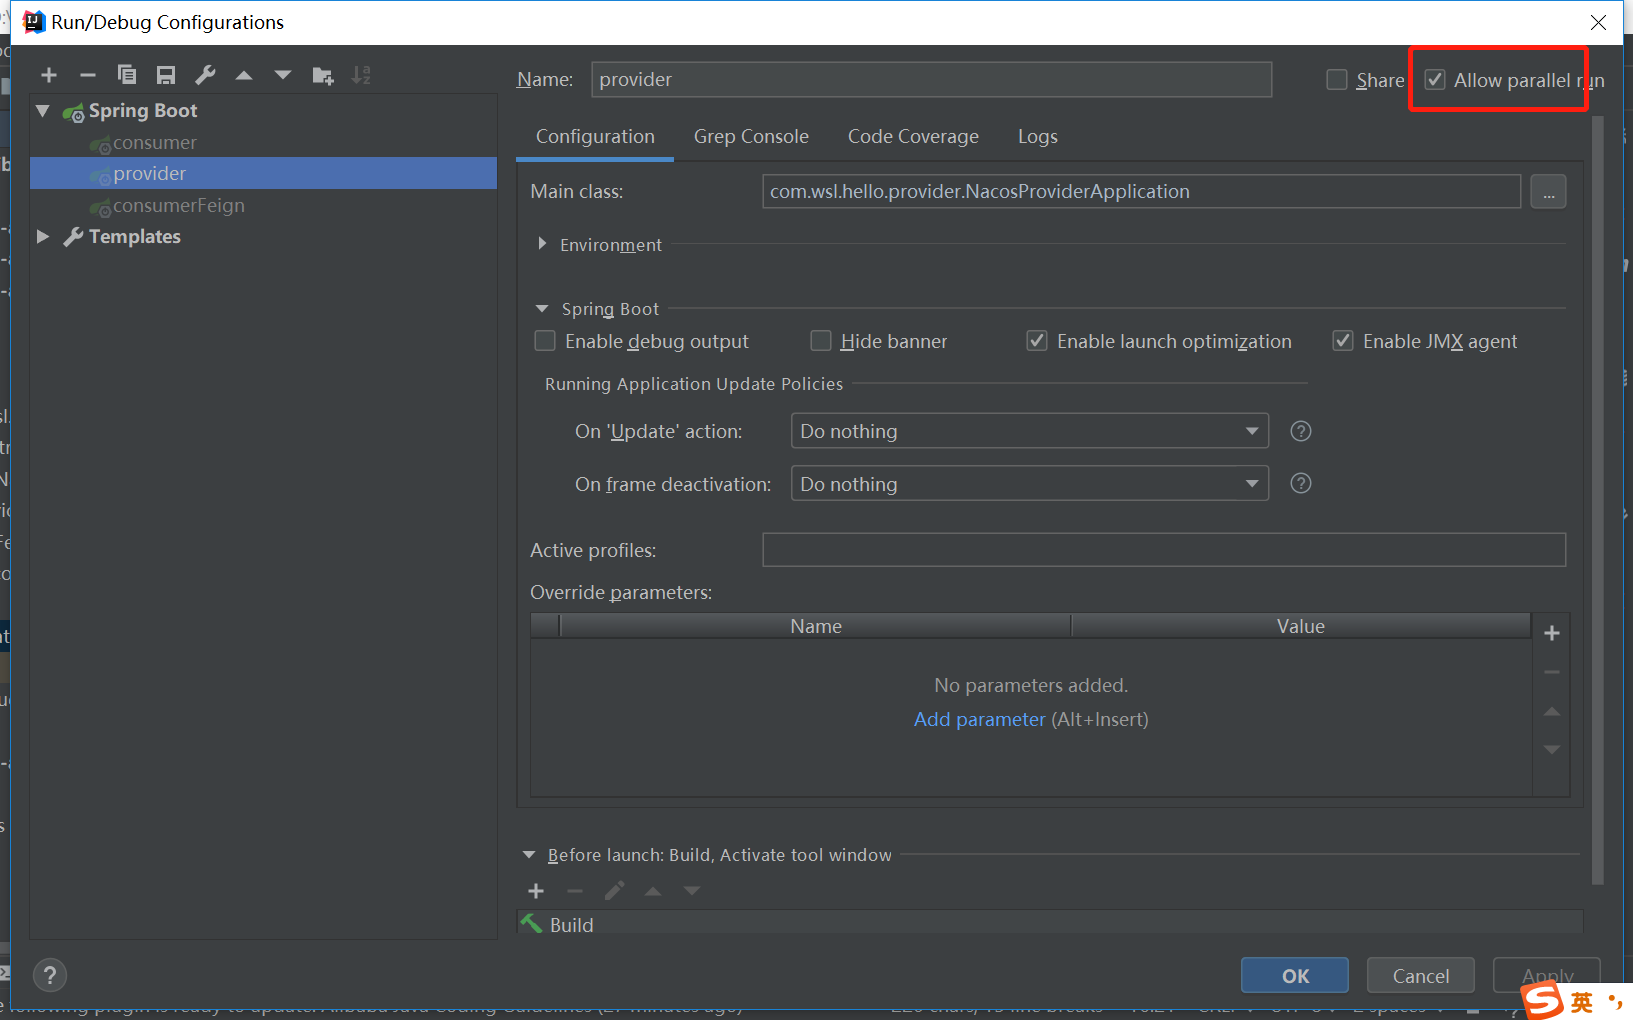
然后修改yml文件里的端口号再启动一个就可以了。
- 启动多个
consumer-provider实例,效果图如下: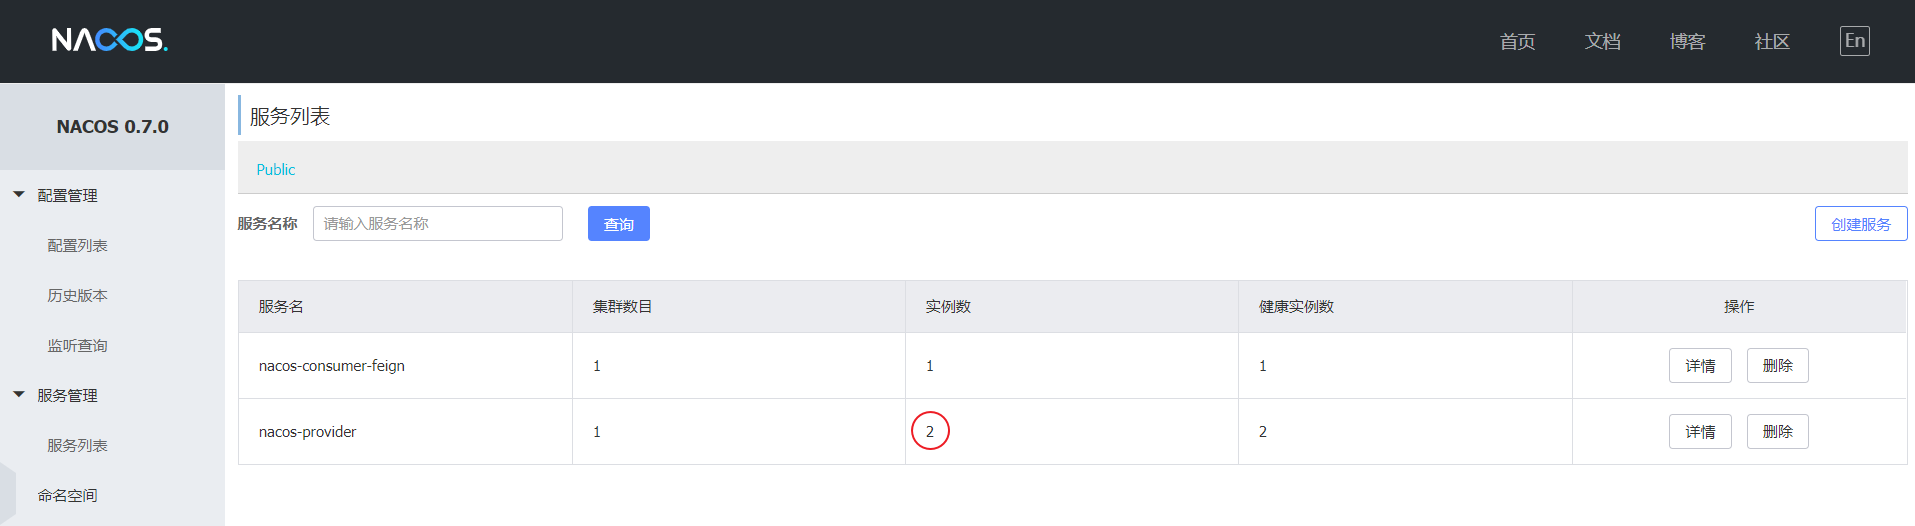
- 修改
consumer-provider项目中的Controller代码,用于确定负载均衡生效
package com.wsl.hello.provider.controller;

import org.springframework.beans.factory.annotation.Value;
import org.springframework.web.bind.annotation.GetMapping;
import org.springframework.web.bind.annotation.PathVariable;
import org.springframework.web.bind.annotation.RestController;

@RestController
public class NacosProviderController {

    @Value("${server.port}")
    private String port;

    @GetMapping(value = "/test/{message}")
    public String test(@PathVariable String message) {
        return "Hello Nacos Discovery " + message + " i am from port " + port;
    }
}
在浏览器上多次访问 http://localhost:9092/test/hi,浏览器交替显示:
Hello Nacos Discovery Hi Feign i am from port 8081
Hello Nacos Discovery Hi Feign i am from port 8082